Showing posts with label Other crafty projects. Show all posts

Saturday, September 17, 2011

Finally!

Hi all! School started 10 days ago and it seems that I am still filling out paperwork and getting things organized. I made a little time last night to stamp, though. I've recently received some fun stampy stuff in the mail and have been waiting patiently to use it.


This is a card for my daughter to send to her friend who has moved overseas. They talk/IM through Skype sometimes but mail in your mailbox is always a fun surprise. I found this stamp set from Avocado Arts and thought it would be cute for cards for my daughter to send, plus it has the cartographic element that I love (yes, I'm a geography nerd). I've got some more ideas for this stamp set when I can find the time.


This was just a little funny something that I made for a friend's 40th birthday party. I had seen a similar idea on Pinterest but it was for someone turning 30. So which sucks more: 30 or 40? I don't know yet. Ask me in a few months. This is another cute idea but I didn't have time to get all Martha and craft this.

Hope you are ready for a great weekend!

Tuesday, December 21, 2010

The Magic Number


This year I made 1,632 cookies for our annual Cookie Party. We had lots of guests this year and I feel like a bad hostess because I am sure I did not get to talk to everyone. Everyone left with full bellies, big smiles and a bag of cookies, so that is good enough for me!

Now that (most of) my baking is done, I have time to stamp! I made a bunch of tags for gifts last night. I found a bunch of white cardstock scraps and made these:


These are based on a Card of the Week from the A Muse Newsletter a few weeks back. Here is a look, in case you missed it:


Then, I pulled out some extra sturdy kraft cardstock that I found in October at Angela's Happy Stamper. I made these tags:


which were based on a bag from Starbucks that had a yummy pumpkin scone in it:


Then, I had a little bit of the kraft cardstock left, so I made these:


Believe it or not, but this tag was inspired by a tag that was on a gift that Betty Haynes gave to Bob Wallace in "White Christmas." The tag is really quite different than this one, but it inspired me nonetheless!

I haven't put all of the holes and ribbons on these yet because I like to wait to see where to punch holes based on the wrapped package and ribbon placement. Guess what my next chore is? I have to do my husband's gifts tonight since he is still out of town.

tag info: all stamps, white cardstock and ribbon by A Muse Artstamps, colored pencils, Copic markers, superfine glitter, Stickles, Nestabilities dies and kraft cardstock.

Sunday, December 12, 2010

Have Mercy!

Since my youngest started preschool, I've found myself able to volunteer at school more often and it has taken up free time that I wish I had. But, it is important for me to be in the school and staying involved as much as I can.

It is cutting into my crafty time because I'm not getting all of my house work done during daylight hours.

On top of that, I've been consumed by baking cookies for our annual party and quick bread for holiday gift giving.

But, last night, I sat down to make something, just because. Well, actually, because I wanted something pretty to hold some handmade candy canes I had bought.


A Muse has a simple but cute candy cane holder template that I used. Then, using the "glitter on double-sided adhesive" trick, I made the lines with some Martha Stewart sparkly red glitter. Add a little baker's twine and a stamped tag, and I had a cute box.

A little belatedly I realized that I could post this on the Moxie Fab World Challenge: Glitter is Glam. This technique is one mentioned in the post, too, so you should give it a try!

Monday, September 13, 2010

A Muse 2010-2011 Calendar preview

For the last few years, A Muse has sold a calendar for digital download the profits of which have gone to various charities. The proceeds from this year's calendar will benefit Charley's Fund. Charley Beers was the daughter of a longtime A Muse fan, Amanda Beers. Charley died from an agressive form of Strep A at the end of June. She was only 6 years old. To honor her memory, the Beers family has established "Charley's Fund" which will provide playground equipment and more at her elementary school in Olympia, WA.

This year, Linda has created five different sizes of calendars. It is great to be able to make small gifts for others or a larger size for your personal use. I decided to use the mini sized calendar (it all prints on one page) to make mini keepsake for next year.


I printed it out twice so that I could punch out the calendars with a 2.25" circle punch.


I stamped each one using only the "tiny" stamps that A Muse makes.


My goal is to take a group photo of my kids once a month, print it and add it to the mini book.


This was from this year, but I wanted to show you what I plan on doing. It will be a really informal look at our year, just our everyday life! I am looking forward to putting it together as the year goes by. Hopefully I will remember to share each month with you all.


Check the AMN blog for links to other ideas today and for the next few days.

Please note: The A Muse Calendars are a download product only. Nothing will be shipped to you. Calendar orders are only processed during regular business hours {monday to friday 8a to 5p}. Once your order has been processed, you will have unlimited access to the file(s) you have purchased.

Saturday, July 3, 2010

Happy Birthday, America!


Hope you have fun celebrating this weekend!

Monday, June 28, 2010

Snow Memories

Well, it has been unusually hot here this June (kinda like how it was unusually snowy this past winter). Way back when we had all that snow I took lots of photos in between all the shoveling I was doing. I made a mini album using some of my stamps so that we could look back fondly on all those snowy good times. I figured today would be a good day to share the album with you!


I used thick clear acrylic covers for the front and back. I pulled out my white Staz-On for this project and didn't have any problems at all.


For each set of pages I did a little scene with my stamps and a photo.


The interior clear acrylic pages were great overlays. I stamped or embellished these.


I also pulled out my snowflake punches for the pages. It was great to put those lesser used shapes!


It was also important that I mentioned the dates for each photo. Some were taken in December 2009 when we had about 20" of snow just before Christmas.


My husband was a trooper out in the snow. It would have been so easy to stay inside and watch the snow fall, but we were out there together in the windiest and snowiest parts of those days. It is really crazy to think back about it.

I want to thank that sweet Georgia peach, Michelle, for her Saturday scrap series that reminded me that I need to share my little project.

Friday, June 25, 2010

It's Finally Here!

Goodness, have I been looking forward to summer for a long time. Because of our crazy winter storm, the kids just finished school yesterday. And, if you are a parent of school-aged children, you know how busy the last two weeks of school can be. It was nice to let the kids sleep in this morning!

With the end of school comes the responsibility of recognizing those who work hard throughout the year. Each family at our bus stop chipped in to get a gift card for the bus driver. Mrs. T is great, so friendly and nice, the kids love her. More than once did I hear of her generosity towards the kids and we wanted to thank her for that. I offered to make a card for her that would hold the gift card. I decided to make one similar to the one I made that was shared on the AMN blog a few weeks ago. Someone had commented that it would be nice to have a tutorial on how to make it, so I took a few "in progress" photos.


Here is the strip of cardstock to begin. It measures about 3" by 8.5". I actually didn't measure the height, but it needs to be just a little bigger than a gift card.


Next, I laid a gift card in the center of the cardstock. I scored lines at 3.75" and 7.25". Then, gently fold on the score lines.


Next, trim off some of one side. This is really up to you. For the one on the AMN blog, I trimmed about an inch, then cut off the corners. This one is more simple; I cut off about .75".


Since this was for a bus driver, I used the school bus. I just love those happy faces! Then, using my Slice, I cut a small octagon, like the ones on a school bus. What you need next is to put a pop dot or two on the longer of the two flaps, just outside where the top flap would lay.


I wrote Thanks and outlined the octagon with a white gel pen, then adhered it to the pop dots, just off center, so that it covers the top flap, to keep the card closed.


Here is the inside. I put a glue dot with a plastic cover inside so that the gift card could be placed right on top of it. Just for fun, I had a secret message for Mrs. T when she uses her gift card.

For the teacher gift card, I added more to the inside of the card, but we wanted to have the kids sign their names, so it is blank. But, you could get creative with it. I like this design; it takes very little time and can be customized for anyone or any occasion.
When I started writing this, I realized that I had another series of pictures of a project that I have been meaning to share for a long time now. So, I'll have something else for you soon!


card info: cobalt blue, petite gingham yellow and swiss red cardstock, school bus fun, you're the best by A Muse Artstamps, Signo white gel pen, pop dots, glue dot.


Tuesday, June 8, 2010

Technically Crafty

Hi all! I don't have anything stampy to share today. I've been busy in my hole, but it is still under wraps. Sorry :(

But, I have been working with a different part of my brain in the craft department the last few days; a technical, more precise activity: sewing. I find that sewing is challenging because if you mess up, you can't easily toss it aside and start over on a new cut of fabric (too expensive, for one). It may take more time to get to a finished product, but, it is a satisfying end.


This is an apron that I made without a real pattern. Talk about challenging! I used a halter swim top as pattern/guide for the bodice, then added a plain skirt front with a simple ruffle. It was fun to do. I think that I could work out the kinks on this one and maybe use it a a fun bridal shower gift.


Here is a look from the side. Please ignore the slouch and bulges on the model. She is a mother of four who knows she should stand up straight, but is just tired.


This is what I've decided to call my "rags to riches" shirt. I've seen lots of embellished tees on some sewing blogs and thought that the techniques would be fun to try. Many people are using cheap shirts or old shirts for the embellishments. Well, I had this t-shirt that had a couple of holes in it and I thought I'd use it for a rag. Then I remembered that it could provide me with quite a lot of long strips of white knit material. After some cutting and sewing and pulling, I had about 7 ruffled pieces. These can be wound and stitched together to make rosettes. I sewed three rosettes to a plain white v-neck shirt that I had in my drawer and now I have a pretty shirt to wear on my date tonight with my husband to see Conan O'Brien's "The Legally Prohibited from Being Funny on Television Tour" in D.C. Fun!

Monday, May 10, 2010

Birthday Blog Hop Winner

The winners from the A Muse Birthday Blog Hop have been announced on the AMN blog today. The winner from my blog post was scrapycandy. Congrats! Enjoy your wild rose and many thanks stamps.

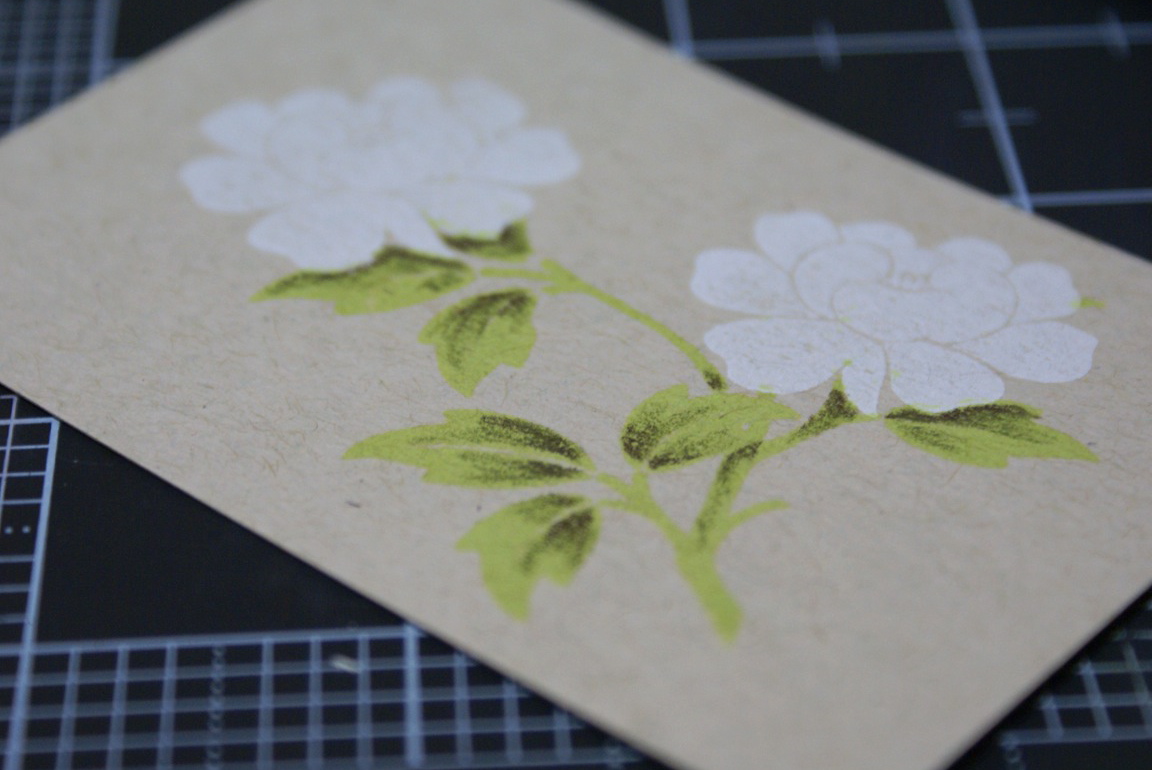
Many people commented that they had not seen the colored pencil technique over chalk ink before and asked for some instructions on how to do it. I have been wanting to try the wild rose in a different color, so I photographed the process for you.


First, I stamped the wild rose in white ink then masked the roses and stamped the wild rose branch in a light green. The key to this technique is to apply the light colors first, similar to rock and roll stamping. I then used a darker green colored pencil to apply shading to the leaves. With this, the best thing to do is to think of shadows. Where would those be on a leaf? Well, if a blossom is covering a leaf, the shadow is closest to the flower.


After you've added your dark green, go back, and very sparingly, add some brown (or even darker green) in small areas. This just adds to the depth, so you can stick with the one color if you want.


I went back with my dark green pencil and added a bit more along the leaf edges. At this point, you can even use a light green pencil to cover any spots to decrease the shading.


Now, time to tackle the roses! My parents have had roses that are very light in color with hints of darker pink, so I was trying to duplicate that. First, I went with a light peach colored pencil to add shading close to the center of the blossom. Notice the center petal; the back of the petal is what is facing out, so the pink color wouldn't be visible, so it is left white. I also added some light green and small dots of dark pink to the center of the bloom.


To finish off the rose, I went back with a darker color pink and added detail in small bits.


The final step was to add just a hint of white colored pencil to the veins on the leaves. The white gives some oomph to the leaves. I used this as a cover to a small notebook to keep my "to do" lists!


This close-up should give you a better look at the detail of the project. I hope that helps any of you wanting to give this a try. If you have more questions, please let me know!

stamps: wild rose and wild rose branch by A Muse Artstamps
paper: kraft cardstock
ink: limepeel fluid chalk, frost white pigment ink by ColorBox
colored pencils: white, light peach, pink, moss green, dark umber by Prismacolor

Saturday, December 12, 2009

Getting My Craft On

Hello everyone! I cannot believe that it has been almost one month since my last post. We went to Massachusetts for Thanksgiving, came home and had a party for my son who turned 10 while we were gone and I've been trying to get so many other things done.

I've allowed myself a breather for a few moments to catch up with all of you and say hi. I haven't been down in my stamping hole much lately because I have been busy filling my freezer. Take a peek:


Our annual cookie party is next Sunday and I am almost done with my baking. This freezer is chock full! I haven't made my final tally but I'll let you know...

I've also been busy with crafty fun with my littlest girls. I traced their hand prints and they put those together with tape and stickers to make a wreath for the inside of our front door:


My oldest daughter wanted to do some fun crafty stuff, too, so she helped me make these, for our "forest" of paper crafted trees:


The felt one has some A Muse pearls on it - a perfect touch!

While I was busy with felt, I also made some time to sew some ornaments. This was a great thing to do in the car during a long trip. Here is a picture of the stars I sewed and made into a garland that is now hanging above our fireplace mantel:


I found the template and instructions here.

I did pull out some stamps yesterday so that I could make treat bag toppers for something I assembled for my Sunday school students for tomorrow morning:


This week I am going to try to get all of our holiday cards in the mail. Once that chore is out of the way, I may be able to get some fun stamping done. I've gotten a lot of inspiration from the A Muse CT with all of the tags they made and Julie has been posting some seriously great cards. There is so much swimming around in my head; I've got to find some time soon!

Have a great weekend :)

Wednesday, September 2, 2009

To Adorn My Mantel


I really wanted to do a big project for the Halloween release from A Muse. I couldn't decide what to do, though. I thought about some more blocks or a countdown calendar, but couldn't find the right materials. Then, when I was cleaning out a drawers of mini albums and other knick-knacks, I found this accordion card (each panel measure about 4.25" x 5.5"). With a little creative positioning, I was able to make this Halloween mantle decor.

It might be a bit too busy with all of the images and letters, but my kids love it. They cannot wait for the rest of the Halloween "stuff" to come out of boxes and get displayed all over the house.

I took a few close-up photos of the panels so you could see a bit better.


I looked through my stash of buttons and found lots of black, orange and green to add to the card panels. And check it out, top left, another great use for my vintage label punch from Macgill. The BOO! fits perfectly!


The middle panels feature more buttons and lots of bats. I glittered the crooked house and used my distressing inks again on this project. It gives everything a nice vintage look.


The last two panels have some more of those flocked spiders. Creepy! (I also flocked the cat and crow on the first panels). There is that vintage label punch again, this time without the smaller oval. More glitter on the witch's hat and the pumpkins, too.

Today is the day that you can see all of the stamps, paper, ribbon and twinkle stickers over at A Muse Artstamps. Happy day!


Wednesday, August 5, 2009

The Grand Finale!

Yesterday I decided to share the football star card instead of a mini album page because I'd only be able to share one image with you. However, by waiting for today, I can share the rest of the pages with you because it is release day and you can see all of the stamps for yourself! If you don't know what I am talking about, look here.

On the the pages!


This is a little embellishment under a photo of my daughter and her very best preschool pal. They really had fun times together (that sentiment is on the school clear set).


Here is the chalkboard frame. I know that some of the other CT members used white ink for words on their chalkboards, but I wanted my own words on it, so I used a white colored pencil and I think the overall look is pretty good!


A photo with the teachers at the end of the year and a class performance photo. I used a couple of new stamps. Here are some close-ups:


That is a red twinkle sticker over the apple/heart.


And the crayons, minus one because it wouldn't fit.

Thanks for joining me down memory lane for amuse-bouche this week!